Guide:Ren'Py visual novels on Steam/DLC: Difference between revisions
images |
m nocat |
||
| Line 1: | Line 1: | ||
{{guide|[https://bobcgames.com Bob Conway]|contrib=no}} | {{guide|[https://bobcgames.com Bob Conway]|contrib=no|nocat=yes}} | ||
DLC can range from extras like a soundtrack or artbook to content that modifies the game itself. | DLC can range from extras like a soundtrack or artbook to content that modifies the game itself. | ||
Latest revision as of 13:52, 19 February 2025
|
|
This page is community guidance. It was created primarily by Bob Conway. Like all guides, this page may contain advice that is not valid, safe, or suitable for your particular situation. Please exercise caution. Learn more Community contributions were not requested - please discuss on the talk page before editing this guide. |
DLC can range from extras like a soundtrack or artbook to content that modifies the game itself.
Note that each piece of DLC will have its own store page and be subject to its own review by Steam before the page can go live. Publishing of the content itself is also independent of the main game itself.
All DLC, whether it's supplemental materials or game content is handled basically the same way in Steam, so we'll start with the non-Steam aspects of DLC creation.
This guide is intended to help you with a high-level overview of how to add such content, but it is strongly recommended that you are extremely comfortable with Ren'Py and coding before attempting to add Game Content DLC.
Soundtracks
Soundtracks are a special kind of Steam DLC that contains specifically MP3 files. I believe you do NOT have to own the base game to purchase a soundtrack, so price accordingly.
From your dashboard, select View Associated Items > All Associated Packages, DLC, Demos and Tools. You'll see a page like this.

Click "Add Soundtrack" and confirm the prompt. This will create a soundtrack project. Click on it and you should see a familiar page.
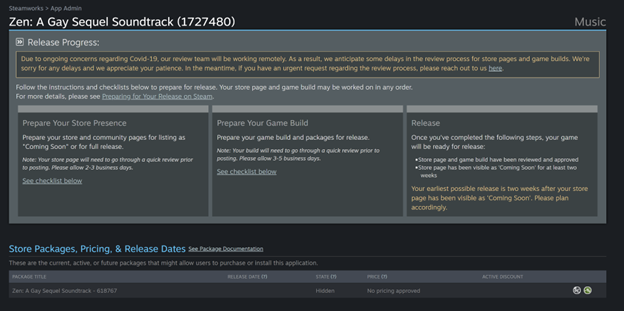
Soundtracks don't have quite as many requirements as regular games, and their store pages are distinct from the base game's.
Assemble the Files
You'll need the tracks available in mp3 format, ideally with associated metadata. (See the official documentation for details.)
Simply zip up the files (they don't have to be in a folder).
If you have high-quality files, you'll need to create a separate ZIP. Do not include the mp3s in the same ZIP as the wav files.
Create the Store Page
Many of the same above steps apply, except the store requirements are simplified. Here's references back to the appropriate above sections that you'll need to complete for the soundtrack. Reference the Steam checklist for the others.
- Fill out basic info and description
- Including supported operating systems (which should be all) and overall file size
- Specify mature content settings and ratings
- Provide album cover art and additional images
- One square album cover art image is required
- Additional images, such as liner notes, are optional
- Set pricing for the package
- Remember that the soundtrack can be purchased independently of the base game
- Set a release date
- Remember that the soundtrack has its own two-week release timer from the base game
- Fill out album metadata
- Fill out a CSV for track metadata
- Upload one screenshot
- For some reason…?
- Upload 4 or 5 capsule images
- A 460x215px header image
- A 231x87px small image
- A 616x353px main image
- A 184x69px capsule image
- Optionally, a 374x448px tall image
- Upload community images and a client icon
- Which can be generated from an icon.ico client icon file
Upload the Files to Steam
Then just upload your ZIP file containing the MP3s.
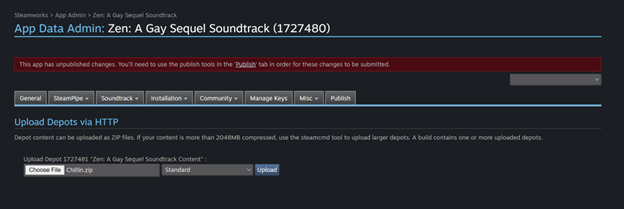
And ensure it is set as live on the default branch.

You also need to add an install directory. Name it something reasonable.

You will also need to explicitly add the standard depot to the package. Click on the package in the dashboard.

And then add the default depot to the package.
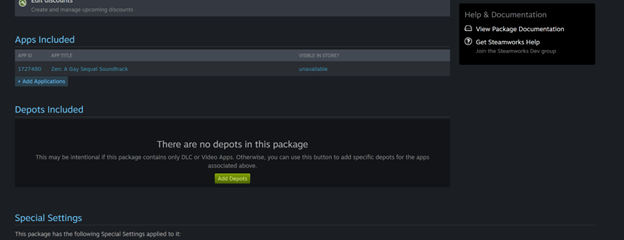
You'll also need to add the depot to all packages for the soundtrack, which you can access from dashboard > View Associated Items > All Associated Packages, DLC, Demos and Tools. Add it to the beta testing and developer comp packages.

If you have high-quality files, you'll need to make a second depot for them (of type high quality audio), and also add the depot to the same packages.

Submit Your Soundtrack For Approval
You can then submit the store pages and build for review by Steam in the usual manners from the dashboard. (For a soundtrack, you can't submit the "build" for review until the store page has been submitted for review.)

Like full games (and unlike the demo and other DLC), you must have the store page published for two weeks before you can release. Remember that, once your store page is live, you must Publish any time you make additional changes to the page.

After the two weeks are up, you can release the soundtrack just like the full game.
Other Types of DLC
Artbooks or Other Supplemental DLC
Steam cannot support ZIP files inside ZIP files, so if you have a collection of DLC (for example, wallpaper images), you'll need to collect it in a folder instead.
Because DLC is downloaded to the same base folder as your game, you'll also want to make a new base folder for the DLC.
For example, YAGS has wallpaper DLC and a Behind-the-Scenes Book. These files are structured under a common "YAGS Digital Extras" folder:
- YAGS Digital Extras/Wallpapers/mobile/adam.jpg
- YAGS Digital Extras/Wallpapers/mobile/carlos.jpg
- YAGS Digital Extras/Wallpapers/desktop/adam.jpg
- YAGS Digital Extras/Wallpapers/desktop/carlos.jpg
- YAGS Digital Extras/Behind the Scenes Book/BTS_Book.pdf
Create a ZIP file that includes this folder inside it. (That is, if you unzip the ZIP file, you'll get a folder named "YAGS Digital Extras" with the above contents in that folder.) You'll want to do this because the DLC will be dropped into the same base folder as the base game. For example, if the base game is
<steam directory>/Yearning A Gay Story/YAGS.exe
the extras will be located in
<steam directory>/Yearning A Gay Story/YAGS Digital Extras/…
(This is less of a problem if you kept your exe in a subdirectory in Build Configuration, but you'll probably still want a separate directory for organization.)
After you have your DLC structured in this manner, continue with Create the DLC in Steam.
Additional Game Content DLC
You'll need the DLC (which should be in the form of an rpa file, or a collection of rpyc and other files) in the same "game" directory as your base game, so reference where you put your exes in Build Configuration, and make sure the files are zipped in the same place.
For example, if your executables are <steam directory>/Your Project/project.exe (with a corresponding <steam directory>/Your Project/game folder), you will need to create a ZIP file containing a "game" folder at the base, and the rpa or rpyc (and other) files inside that folder.
To be even more clear, assume your base game is at
<steam directory>/Yearning A Gay Story/YAGS.exe
where <steam directory>/Yearning A Gay Story/ are the common "root" directories for your base game. Any DLC you upload will be dropped into that same directory. So if you upload a ZIP file containing a single "sample.rpa" file at the root of the zip file, it will be downloaded to
<steam directory>/Yearning A Gay Story/sample.rpa
which is almost certainly not what you want. (Ren'Py only picks up rpa and rpy files inside the "game" directory.)
This guide is intended to help you with a high-level overview of how to add such content, but it is strongly recommended that you are extremely comfortable with Ren'Py and coding before attempting to add any form of DLC.
I won't go into much detail on how to add additional content in this manner here, but a few tips:
- defaulting your variables is extremely important for patches, since save files from the base game won't have those variables defined yet
- To prevent issues with saves from loading, DLC of this manner is better if you have a "chapter" approach to your game, with different chapters accessible from the main menu
- You can use a dict or set or list to store unlocked chapters, and push additional entries into it with init blocks in your DLC rpy files
- If you must continue from the previous game, show a "Save now to continue in the DLC" screen or text to the user, and utilize a jump expression with a constant overridden in the DLC so base game files don't have to be modified by the DLC
- Test your patch locally by generating the patch file(s), and then dropping them into a new, clean build of your base game
Create the DLC in Steam
From your dashboard, select View Associated Items > All Associated Packages, DLC, Demos and Tools. You'll see a page like this.

You'll select a different kind of DLC based on what you're trying to create. For most of the above categories, you'll scroll down to "All DLC" and create a generic DLC.

Name your DLC something starting with your game's name.
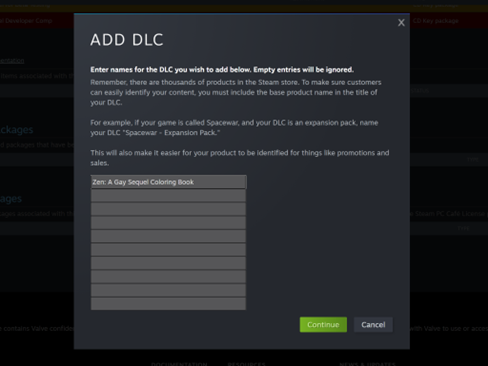
Then click on the DLC. You will see a familiar dashboard. The steps here are familiar to above, but are a bit simpler.
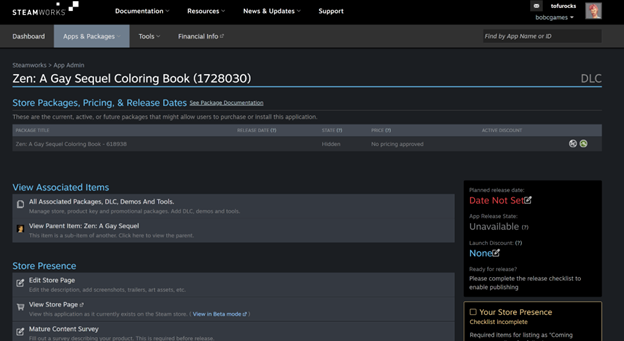
Create the Store Page
Many of the same above steps apply, except the store requirements are simplified. Here's references back to the appropriate above sections that you'll need to complete for the DLC.
- Fill out basic info and description
- Including supported operating systems (which should be all) and overall file size
- Specify mature content settings and ratings
- Set pricing for the package
- Note that players cannot pay for (and download) the DLC without owning the full game
- Set a release date
- Remember that the soundtrack can release at any point after the main game's store page is available
- Set supported operating systems
- Set system requirements
- Set tags
- Add a screenshot
- Add capsule images
- A 460x215px header image
- A 231x87px small image
- A 616x353px main image
- An optional 274x448px tall image
- An optional 1438x810px background image
- There are no library images for DLC because they are attached to the parent game in a player's library
- The support info should copy from the parent game, but you can check or change it
Upload the Files to Steam
The depos for the DLC, by default, are managed via the base game. This is probably what you want for DLC, so don't mess with that setting.

First, navigate to the Depots page of the base game (Technical Tools > Edit Steamworks Settings > SteamPipe > Depots) and click the "Add DLC (associate a DLC's main depot)" button.

Select your DLC and continue. Remember to hit the "Save" button.
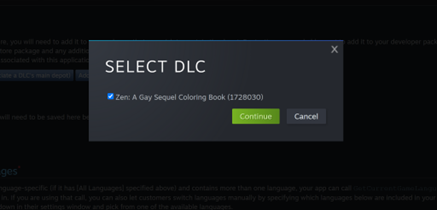
You now need to Publish to fully associate the DLC Depot with the DLC (and associate all of that to the main game). If you try to upload content before then, as the warning on the upload page notes, it will fail.

You can now use the upload page on the main game to upload your ZIP file containing your DLC. Remember to target the correct Depot for the DLC. You can immediately set the depot as live for the default branch.

After making this upload, make sure you Publish changes from the base game. (Yes, again.)
Note: Despite what the pages suggest, you do not need to associate the new depot with the DLC packages. (Indeed, if you try, there will be no depots shown, because the "default" depot for the DLC is already associated.) Make sure you do not associate the DLC depot with the base game's packages, or the base game will include that content without requiring DLC purchase.
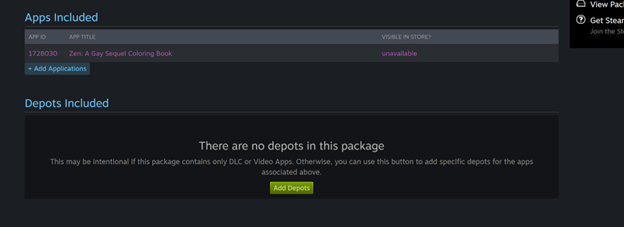
That should be everything. You can confirm this works properly by toggling DLC in the properties of your game in the Steam client, and checking local files to make sure the DLC files properly do (or don't) show up.
Submit Your DLC For Approval
After you're happy, submit your DLC for the usual approval by Steam.

After the page and build are approved, you'll be able to release the DLC for purchase and download.

There are two options for release. Unlike full games, you don't need to have the page as Coming Soon for two weeks before you can publish, since DLC cannot be purchased without owning the parent game.

If you first posted as coming soon, you can later fully publish.

| |||||

