Guide:Ren'Py visual novels on Steam/Upload: Difference between revisions
m oops |
images |
||
| Line 4: | Line 4: | ||
''If you’re making a game in Ren’Py, and your game build is under 2 GB, this guide is all you need. You don’t need to deal with the SDK or any Steamworks build process or pipelines.'' | ''If you’re making a game in Ren’Py, and your game build is under 2 GB, this guide is all you need. You don’t need to deal with the SDK or any Steamworks build process or pipelines.'' | ||
<br>[[File:Renpy_Steam_Guide_-_Upload_01.png]] | |||
First of all, you should [[Guide:Ren%27Py_visual_novels_on_Steam/Achievements|update your game code with achievements]] if desired. You should also [[#Setting up Archiving For Your Game (Optional)|set up archiving]] if you haven’t. Ensure that your game builds and plays correctly with achievements added before proceeding with any of the following steps. | First of all, you should [[Guide:Ren%27Py_visual_novels_on_Steam/Achievements|update your game code with achievements]] if desired. You should also [[#Setting up Archiving For Your Game (Optional)|set up archiving]] if you haven’t. Ensure that your game builds and plays correctly with achievements added before proceeding with any of the following steps. | ||
| Line 44: | Line 44: | ||
==Installing Steam Libraries in Ren’Py== | ==Installing Steam Libraries in Ren’Py== | ||
Before doing anything else, you’ll need to download the Steam libraries in Ren’Py. If you’re running the latest version of Ren’Py, in the launcher, click “preferences” in the lower right, then Actions > Install libraries, then Install Steam Support. You must have an internet connection. | Before doing anything else, you’ll need to download the Steam libraries in Ren’Py. If you’re running the latest version of Ren’Py, in the launcher, click “preferences” in the lower right, then Actions > Install libraries, then Install Steam Support. You must have an internet connection. | ||
<br>[[File:Renpy_Steam_Guide_-_Upload_02.jpg]] | |||
You only need to do this once. If you’re not sure if you’ve done it, simply click “Install libraries” again. The screen will say if Steam support has been installed. | You only need to do this once. If you’re not sure if you’ve done it, simply click “Install libraries” again. The screen will say if Steam support has been installed. | ||
| Line 56: | Line 57: | ||
The value should be your Steam app id, without quotes around it. The value can be found either in the URL of your game’s dashboard in Steam, or next to your game’s name in the dashboard. | The value should be your Steam app id, without quotes around it. The value can be found either in the URL of your game’s dashboard in Steam, or next to your game’s name in the dashboard. | ||
<br>[[File:Renpy_Steam_Guide_-_Upload_03.png]] | |||
Once this is added, as long as you have Steam open and are signed in to it, launching your game (even from the Ren’Py launcher) will behave as if you launched it from Steam, complete with Steam overlay. (Achievements should also work, so you can test them without needing to publish to Steam first.) | Once this is added, as long as you have Steam open and are signed in to it, launching your game (even from the Ren’Py launcher) will behave as if you launched it from Steam, complete with Steam overlay. (Achievements should also work, so you can test them without needing to publish to Steam first.) | ||
| Line 63: | Line 64: | ||
If you ran the game from the launcher, you can fix this by deleting the generated steam_appid.txt file, located at “<renpydirectory>/lib/<yourOS>/steam_appid.txt”, for example “renpy-7.4.6-sdk/lib/windows-x86_64/steam_appid.txt” if your launcher is normally “renpy-7.4.6-sdk/renpy.exe”. You’ll have to do this every time after running a game with config.steam_appid set from the launcher. | If you ran the game from the launcher, you can fix this by deleting the generated steam_appid.txt file, located at “<renpydirectory>/lib/<yourOS>/steam_appid.txt”, for example “renpy-7.4.6-sdk/lib/windows-x86_64/steam_appid.txt” if your launcher is normally “renpy-7.4.6-sdk/renpy.exe”. You’ll have to do this every time after running a game with config.steam_appid set from the launcher. | ||
<br>[[File:Renpy_Steam_Guide_-_Upload_04.png]] | |||
You can also prevent this problem by making a Markets build of your game and running via that build ''instead of'' via the launcher, which will ensure that only that build picks up the Steam appid for that game. | You can also prevent this problem by making a Markets build of your game and running via that build ''instead of'' via the launcher, which will ensure that only that build picks up the Steam appid for that game. | ||
| Line 75: | Line 76: | ||
First, make a build of your game as “Windows, Mac, Linux for Markets”. | First, make a build of your game as “Windows, Mac, Linux for Markets”. | ||
<br>[[File:Renpy_Steam_Guide_-_Upload_05.jpg]] | |||
If your game is at the top level (see [[#Build Configuration|Build Configuration]]), you will need to unzip the resulting file and re-zip it so it does not contain a folder. The ZIP generated by Ren’Py should look something like this: | If your game is at the top level (see [[#Build Configuration|Build Configuration]]), you will need to unzip the resulting file and re-zip it so it does not contain a folder. The ZIP generated by Ren’Py should look something like this: | ||
<br>[[File:Renpy_Steam_Guide_-_Upload_06.jpg]] | |||
Unzip it, then navigate into the folder so you can see the exe itself. Highlight all files in this directory, and directly generate a ZIP from that: | Unzip it, then navigate into the folder so you can see the exe itself. Highlight all files in this directory, and directly generate a ZIP from that: | ||
<br>[[File:Renpy_Steam_Guide_-_Upload_07.jpg]] | |||
''Warning: Do not launch your unzipped game before zipping for Steam. Launching the game will sync all game state from your local computer, including persistent data and save files. Uploading this to Steam will cause all players to share this state, with no way to undo the damage due to the way Ren’Py stores a copy of all data on the local computer.'' | ''Warning: Do not launch your unzipped game before zipping for Steam. Launching the game will sync all game state from your local computer, including persistent data and save files. Uploading this to Steam will cause all players to share this state, with no way to undo the damage due to the way Ren’Py stores a copy of all data on the local computer.'' | ||
The resulting ZIP file should look like this (with all files at the top level, instead of containing a folder inside it). This ZIP file can be uploaded to Steam. | The resulting ZIP file should look like this (with all files at the top level, instead of containing a folder inside it). This ZIP file can be uploaded to Steam. | ||
<br>[[File:Renpy_Steam_Guide_-_Upload_08.jpg]] | |||
If your game is not at the top level, you may not need to unzip and rezip the game build. However, you will need to configure your [[#Build Configuration|Build Configuration]] to include the directory name, and you may need to update other configurations with each new build since Ren’Py normally includes the version in the folder name (so you’ll probably want to override the [https://www.renpy.org/doc/html/build.html#var-build.directory_name build directory setting]). (In general, put your game at the top level. It’ll make your life easier.) | If your game is not at the top level, you may not need to unzip and rezip the game build. However, you will need to configure your [[#Build Configuration|Build Configuration]] to include the directory name, and you may need to update other configurations with each new build since Ren’Py normally includes the version in the folder name (so you’ll probably want to override the [https://www.renpy.org/doc/html/build.html#var-build.directory_name build directory setting]). (In general, put your game at the top level. It’ll make your life easier.) | ||
| Line 96: | Line 97: | ||
If your game is under 2GB, you can upload from the web interface rather than using SteamPipe/the SDK. Click the “here” link. | If your game is under 2GB, you can upload from the web interface rather than using SteamPipe/the SDK. Click the “here” link. | ||
<br>[[File:Renpy_Steam_Guide_-_Upload_09.png]] | |||
Then select your ZIP file and upload it. If you have DLC projects (see [[Guide:Ren%27Py_visual_novels_on_Steam/DLC|Creating DLC]]), make sure you upload to the correct depot. (The default depot for your primary project will be “Your project Content”, for example “Zen: A Gay Sequel Content”.) | Then select your ZIP file and upload it. If you have DLC projects (see [[Guide:Ren%27Py_visual_novels_on_Steam/DLC|Creating DLC]]), make sure you upload to the correct depot. (The default depot for your primary project will be “Your project Content”, for example “Zen: A Gay Sequel Content”.) | ||
The “Standard” upload type is fine. | The “Standard” upload type is fine. | ||
<br>[[File:Renpy_Steam_Guide_-_Upload_10.png]] | |||
After uploading, you should see a screen like this. Add a comment and set the build live for the “default” branch. (If this is your first upload, there won’t be a branch yet, so just select None. If your game is already released, you may not want to immediately set it as live or to select a different branch… see [[Guide:Ren%27Py_visual_novels_on_Steam/Testing#After Release|After Release]].) | After uploading, you should see a screen like this. Add a comment and set the build live for the “default” branch. (If this is your first upload, there won’t be a branch yet, so just select None. If your game is already released, you may not want to immediately set it as live or to select a different branch… see [[Guide:Ren%27Py_visual_novels_on_Steam/Testing#After Release|After Release]].) | ||
<br>[[File:Renpy_Steam_Guide_-_Upload_11.png]] | |||
If this was your first upload, you’ll need to manually set the build live. Select the default branch, Preview Change, and then set it live. (For future uploads, you can set them live immediately after upload when you commit.) | If this was your first upload, you’ll need to manually set the build live. Select the default branch, Preview Change, and then set it live. (For future uploads, you can set them live immediately after upload when you commit.) | ||
<br>[[File:Renpy_Steam_Guide_-_Upload_12.png]] | |||
If your game build is larger than 2 GB, you ''might'' be able to use the web tool to upload it in parts, but you’ll probably be better off figuring out the Steam SDK tools. You might try [https://lewdpixels.com/features/publishing-your-project-on-steam-a-renpy-howto/ LewdPixel’s Steam Guide] for help with that. | If your game build is larger than 2 GB, you ''might'' be able to use the web tool to upload it in parts, but you’ll probably be better off figuring out the Steam SDK tools. You might try [https://lewdpixels.com/features/publishing-your-project-on-steam-a-renpy-howto/ LewdPixel’s Steam Guide] for help with that. | ||
| Line 135: | Line 136: | ||
Navigate to Technical Tools > Edit Steamworks Settings > Installation > General Installation and click the Add New Launch Option button | Navigate to Technical Tools > Edit Steamworks Settings > Installation > General Installation and click the Add New Launch Option button | ||
<br>[[File:Renpy_Steam_Guide_-_Upload_13.png]] | |||
Click the button two more times until you have three launch options. ''Do this before editing any of them, or changes will not be saved.'' | Click the button two more times until you have three launch options. ''Do this before editing any of them, or changes will not be saved.'' | ||
| Line 178: | Line 179: | ||
==Debugging Build Configurations== | ==Debugging Build Configurations== | ||
Before doing anything else, check whether your Application name, Depot name, or Package name in Steam contains a period. ([https://twitter.com/ThugzillaDev Thugzilla] ran into a problem with launching when this was the case, as it caused a period to be added in the local Steam folder name.) | Before doing anything else, check whether your Application name, Depot name, or Package name in Steam contains a period. ([https://twitter.com/ThugzillaDev Thugzilla] ran into a problem with launching when this was the case, as it caused a period to be added in the local Steam folder name.) | ||
<br>[[File:Renpy_Steam_Guide_-_Upload_14.png]] | |||
In particular, the Install Folder (dashboard > Edit Steamworks Settings > Installation > General Installation) should not have a period in it. | In particular, the Install Folder (dashboard > Edit Steamworks Settings > Installation > General Installation) should not have a period in it. | ||
<br>[[File:Renpy_Steam_Guide_-_Upload_15.png]] | |||
If the build settings don’t work. Look at the files in your Depot and ensure that the exes are where you expect them to be. Click dashboard > Edit Steamworks Settings > SteamPipe > Builds and click on the depot number for any build to see the contents of the depot. (If you have DLC, Steampipe will automatically merge DLC metadata as a new build every time you upload changes, but you don’t care about those merged builds.) | If the build settings don’t work. Look at the files in your Depot and ensure that the exes are where you expect them to be. Click dashboard > Edit Steamworks Settings > SteamPipe > Builds and click on the depot number for any build to see the contents of the depot. (If you have DLC, Steampipe will automatically merge DLC metadata as a new build every time you upload changes, but you don’t care about those merged builds.) | ||
<br>[[File:Renpy_Steam_Guide_-_Upload_16.png]] | |||
You’ll see a complete list of all files within that depot. | You’ll see a complete list of all files within that depot. | ||
<br>[[File:Renpy_Steam_Guide_-_Upload_17.png]] | |||
Verify in that file list that the exe is either at the top level or appropriately in a folder that is part of the Build Configuration path, based on your settings.. | Verify in that file list that the exe is either at the top level or appropriately in a folder that is part of the Build Configuration path, based on your settings.. | ||
<br>[[File:Renpy_Steam_Guide_-_Upload_18.png]] | |||
==Fixing a Bad Upload (via Web UIs)== | ==Fixing a Bad Upload (via Web UIs)== | ||
| Line 200: | Line 203: | ||
First, navigate to dashboard > Technical Tools > Edit Steamworks Settings > SteamPipe > Depots and create a new Depot in your project. Select the next Depot ID after your current one. (The ID doesn’t really matter, but you just want to make sure it’s not one you’ve potentially used in the past.) | First, navigate to dashboard > Technical Tools > Edit Steamworks Settings > SteamPipe > Depots and create a new Depot in your project. Select the next Depot ID after your current one. (The ID doesn’t really matter, but you just want to make sure it’s not one you’ve potentially used in the past.) | ||
<br>[[File:Renpy_Steam_Guide_-_Upload_19.png]] | |||
You should see something like this. The error is fine for now. Make sure the depot is set to All OSes, and then click the “Save” button under “Save Depot Changes” further down on the page. | You should see something like this. The error is fine for now. Make sure the depot is set to All OSes, and then click the “Save” button under “Save Depot Changes” further down on the page. | ||
<br>[[File:Renpy_Steam_Guide_-_Upload_20.png]] | |||
After saving, the new depot should be assigned to the Base App. This is correct. | After saving, the new depot should be assigned to the Base App. This is correct. | ||
<br>[[File:Renpy_Steam_Guide_-_Upload_21.png]] | |||
Publish the changes (via the Publish tab) to ensure that the new depot is properly picked up by the build. | Publish the changes (via the Publish tab) to ensure that the new depot is properly picked up by the build. | ||
Navigate to SteamPipe > Builds, click the “here” link, and upload your ZIP file (with the fixed build) to the new depot. Set it as live on the default branch and commit. | Navigate to SteamPipe > Builds, click the “here” link, and upload your ZIP file (with the fixed build) to the new depot. Set it as live on the default branch and commit. | ||
<br>[[File:Renpy_Steam_Guide_-_Upload_22.png]] | |||
Publish your changes. | Publish your changes. | ||
<br>[[File:Renpy_Steam_Guide_-_Upload_23.png]] | |||
Next, you’ll need to switch the Depot in all packages to the new Depot. Navigate to dashboard > View Associated Items > All Associated Packages, DLC, Demos, and Tools. There should be three packages there: the Store (or Free to Play) package and two special-use packages (Beta Testing and Developer Comp). | Next, you’ll need to switch the Depot in all packages to the new Depot. Navigate to dashboard > View Associated Items > All Associated Packages, DLC, Demos, and Tools. There should be three packages there: the Store (or Free to Play) package and two special-use packages (Beta Testing and Developer Comp). | ||
For each of these packages, Add/Remove Depots and switch to the new depot. ''You must do this separately for all three packages.'' | For each of these packages, Add/Remove Depots and switch to the new depot. ''You must do this separately for all three packages.'' | ||
<br>[[File:Renpy_Steam_Guide_-_Upload_24.png]] | |||
Finally, navigate back to the depots view (dashboard > Technical Tools > Edit Steamworks Settings > SteamPipe > Depots) and delete the old depot, which should no longer be referenced, by clicking the “X” at the end of the line. | Finally, navigate back to the depots view (dashboard > Technical Tools > Edit Steamworks Settings > SteamPipe > Depots) and delete the old depot, which should no longer be referenced, by clicking the “X” at the end of the line. | ||
<br>[[File:Renpy_Steam_Guide_-_Upload_25.png]] | |||
As always, save Depot changes with the “Save” button, then re-publish. | As always, save Depot changes with the “Save” button, then re-publish. | ||
| Line 287: | Line 290: | ||
Navigate to Technical Tools > Edit Steamworks Settings > Application > Steam Cloud. You should see something like this | Navigate to Technical Tools > Edit Steamworks Settings > Application > Steam Cloud. You should see something like this | ||
<br>[[File:Renpy_Steam_Guide_-_Upload_26.png]] | |||
Byte quota should be 10000000 (ten million bytes, or 10 megabytes), and 500 files. (This should be more than enough for most games’ save and persistent data, but if your game uses particularly many variables or uses classes as variables, you may wish to raise the byte quota.) | Byte quota should be 10000000 (ten million bytes, or 10 megabytes), and 500 files. (This should be more than enough for most games’ save and persistent data, but if your game uses particularly many variables or uses classes as variables, you may wish to raise the byte quota.) | ||
| Line 296: | Line 299: | ||
Scroll down to the Steam Auto-Cloud Configuration section, and click the Add New Auto-Cloud Path button. Add a new entry against the root with the subdirectory “game/saves” with the * pattern for all OSes. The setting should look like this after saving. | Scroll down to the Steam Auto-Cloud Configuration section, and click the Add New Auto-Cloud Path button. Add a new entry against the root with the subdirectory “game/saves” with the * pattern for all OSes. The setting should look like this after saving. | ||
<br>[[File:Renpy_Steam_Guide_-_Upload_27.png]] | |||
Make sure to save the page itself as well, afterward. | Make sure to save the page itself as well, afterward. | ||
| Line 304: | Line 307: | ||
==Setting a Price== | ==Setting a Price== | ||
On your dashboard, you should have a single package for your game under “Store Packages, Pricing, & Release Dates”. Click on the package row. | On your dashboard, you should have a single package for your game under “Store Packages, Pricing, & Release Dates”. Click on the package row. | ||
<br>[[File:Renpy_Steam_Guide_-_Upload_28.png]] | |||
You should see a screen like this if you haven’t priced your package before. Click “Propose Pricing”. | You should see a screen like this if you haven’t priced your package before. Click “Propose Pricing”. | ||
<br>[[File:Renpy_Steam_Guide_-_Upload_29.png]] | |||
Select a USD price, and the other currencies will automatically populate. Note: The other currency values are NOT calculated via current exchange rates, and will mean your game actually sells for cheaper in most other countries. Set accordingly. | Select a USD price, and the other currencies will automatically populate. Note: The other currency values are NOT calculated via current exchange rates, and will mean your game actually sells for cheaper in most other countries. Set accordingly. | ||
<br>[[File:Renpy_Steam_Guide_-_Upload_30.png]] | |||
Steam says they’ll “review” prices, but the first one seems to be fairly automatic. Just publish when ready. | Steam says they’ll “review” prices, but the first one seems to be fairly automatic. Just publish when ready. | ||
<br>[[File:Renpy_Steam_Guide_-_Upload_31.png]] | |||
You can also set a launch discount from the dashboard, under the release date. | You can also set a launch discount from the dashboard, under the release date. | ||
<br>[[File:Renpy_Steam_Guide_-_Upload_32.png]] | |||
==Setting Supported Operating Systems== | ==Setting Supported Operating Systems== | ||
| Line 321: | Line 325: | ||
You’ll need to check (or not check) the 64 Bit Only checkbox for Windows based on your [[#Removing 32-Bit Support for Windows (Optional)|Ren’Py build configuration]]. The macOS build is not notarized, but ''is'' 64-bit compatible. | You’ll need to check (or not check) the 64 Bit Only checkbox for Windows based on your [[#Removing 32-Bit Support for Windows (Optional)|Ren’Py build configuration]]. The macOS build is not notarized, but ''is'' 64-bit compatible. | ||
<br>[[File:Renpy_Steam_Guide_-_Upload_33.png]] | |||
==Submit Your Game For Approval== | ==Submit Your Game For Approval== | ||
After completing all of the required steps in the game build checklist, the section will turn green. | After completing all of the required steps in the game build checklist, the section will turn green. | ||
<br>[[File:Renpy_Steam_Guide_-_Upload_34.png]] | |||
At the top of the dashboard, you’ll be able to submit your game build to Valve for review by clicking the big blue button. | At the top of the dashboard, you’ll be able to submit your game build to Valve for review by clicking the big blue button. | ||
<br>[[File:Renpy_Steam_Guide_-_Upload_35.png]] | |||
Review, as noted, will take a couple days. | Review, as noted, will take a couple days. | ||
<br>[[File:Renpy_Steam_Guide_-_Upload_36.png]] | |||
You will receive an email after your game build is approved for launch. You still won’t be able to launch until the time criteria (two weeks after coming soon, or 30 days after buying your first app credit) are met. | You will receive an email after your game build is approved for launch. You still won’t be able to launch until the time criteria (two weeks after coming soon, or 30 days after buying your first app credit) are met. | ||
<br>[[File:Renpy_Steam_Guide_-_Upload_37.png]] | |||
After the release criteria are met, you can release your game, which allows your game to be purchased and downloaded. | After the release criteria are met, you can release your game, which allows your game to be purchased and downloaded. | ||
<br>[[File:Renpy_Steam_Guide_-_Upload_38.png]] | |||
<br>[[File:Renpy_Steam_Guide_-_Upload_39.png]] | |||
If Valve requires changes to the page or any images, the requested changes will be emailed and will also appear in the “Checklist Complete” section at the top of the dashboard. After making changes, you’ll mark the page as ready for review again until it is ultimately approved. | If Valve requires changes to the page or any images, the requested changes will be emailed and will also appear in the “Checklist Complete” section at the top of the dashboard. After making changes, you’ll mark the page as ready for review again until it is ultimately approved. | ||
<br>[[File:Renpy_Steam_Guide_-_Upload_40.png]] | |||
==Provide Save Files to Steam Support== | ==Provide Save Files to Steam Support== | ||
| Line 345: | Line 352: | ||
There may be times when Steam support requests save files to help test your game. | There may be times when Steam support requests save files to help test your game. | ||
<br>[[File:Renpy_Steam_Guide_-_Upload_41.png]] | |||
If you receive this request, do ''not'' upload save files to the regular "default" app branch. This will cause the same problems as if you run your game before uploading it to Steam. (See [[#I Ran My Game Before Re-Zipping and Uploading|I Ran My Game Before Re-Zipping and Uploading]] if you did this.) | If you receive this request, do ''not'' upload save files to the regular "default" app branch. This will cause the same problems as if you run your game before uploading it to Steam. (See [[#I Ran My Game Before Re-Zipping and Uploading|I Ran My Game Before Re-Zipping and Uploading]] if you did this.) | ||
Revision as of 13:12, 19 February 2025
|
|
This page is community guidance. It was created primarily by Bob Conway. Like all guides, this page may contain advice that is not valid, safe, or suitable for your particular situation. Please exercise caution. Learn more Community contributions were not requested - please discuss on the talk page before editing this guide. |
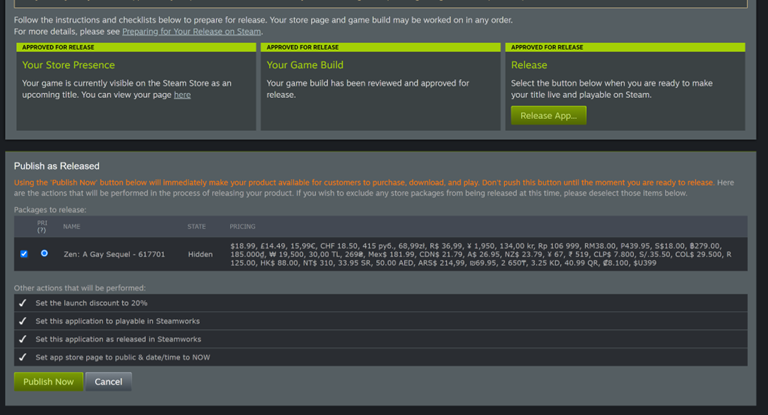
To upload your game to Steam, there are a few more steps you’ll have to take than usual. Steam provides a useful checklist, but we’ll walk through it in a slightly different order, prioritizing actually getting the game build uploaded and working before dealing with the logistical aspects of selling your game.
If you’re making a game in Ren’Py, and your game build is under 2 GB, this guide is all you need. You don’t need to deal with the SDK or any Steamworks build process or pipelines.
First of all, you should update your game code with achievements if desired. You should also set up archiving if you haven’t. Ensure that your game builds and plays correctly with achievements added before proceeding with any of the following steps.
Removing 32-Bit Support for Windows (Optional)
By default, Ren’Py 7.5 and below will generate both a 64-bit and 32-bit executable for Windows. There isn’t a huge reason to generate the 32-bit version at this point (as of May 2020, Windows 10 doesn’t support 32-bit OSes going forward). The 32-bit executable also often causes problems with virus scanners, so if you can, it’s probably better to not generate it.
(Note: This step is not necessary with Ren’Py 8, which does not generate 32-bit builds at all.)
You can disable generation of the 32-bit executable by adding this line to any rpy file (such as options.rpy)define build.include_i686 = False
If you build without removing 32-bit support for Windows, you’ll have some additional configuration you have to do in some of the below steps. We’ll note them as we get to them.
Setting up Archiving For Your Game (Optional)
Before making a build for Steam, I highly recommend you take advantage of archiving. This will ensure that file changes in future game builds (adding new sprite images or deleting music files, for example) do not cause problems for users that have already installed the game, as uploads to Steam via the Steamworks UIs are additive, and there is no way to delete existing uploaded files from the web UI. Using archives instead will cause the user to re-download the updated archive.rpa file, ensuring consistent files between users.
There should already be some archiving code in options.rpy, but this should be all you need. You can put this in any rpy file.
init python:
    build.classify('**~', None)
    build.classify('**.bak', None)
    build.classify('**.rpy', None)
    build.classify('**/.**', None)
    build.classify('**/#**', None)
    build.classify('**/thumbs.db', None)
    build.classify("game/**.webp", "archive")
    build.classify("game/**.png", "archive")
    build.classify("game/**.jpg", "archive")
    build.classify("game/**.ttf", "archive")
    build.classify("game/**.mp3", "archive")
    build.classify("game/**.wav", "archive")
    build.classify("game/**.ogg", "archive")
    build.classify("game/**.rpyc", "archive")
(If you use other image or audio file types in your game, add those in the same manner.)
Note: Archive names are case sensitive. In other words: "archive" is not the same as "Archive". Use the lowercase version.
Installing Steam Libraries in Ren’Py
Before doing anything else, you’ll need to download the Steam libraries in Ren’Py. If you’re running the latest version of Ren’Py, in the launcher, click “preferences” in the lower right, then Actions > Install libraries, then Install Steam Support. You must have an internet connection.
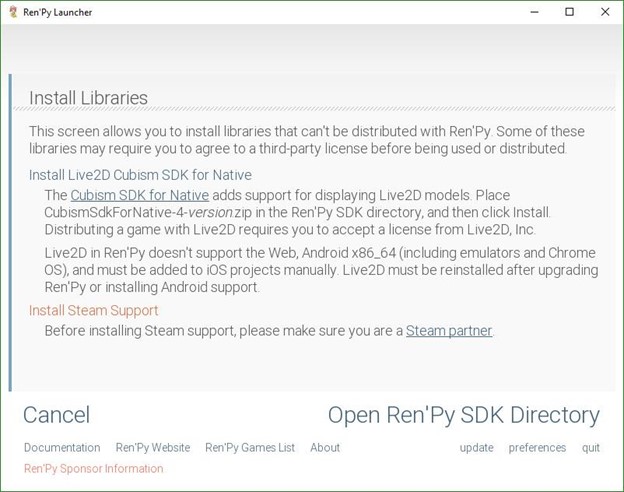
You only need to do this once. If you’re not sure if you’ve done it, simply click “Install libraries” again. The screen will say if Steam support has been installed.
Setting the Steam App Id (Optional)
You can test your game with Steam context (including achievements) by setting the config.steam_appid variable. This is optional, as the game will have its appid available when downloaded by and started up through Steam, but setting it will let you test Steam integration without having to go through the steps of actually uploading a build (and publishing) through Steamworks.
In any rpy file (such as options.rpy), add the following line.
define config.steam_appid = YOUR_APP_ID
For example:
define config.steam_appid = 123456
The value should be your Steam app id, without quotes around it. The value can be found either in the URL of your game’s dashboard in Steam, or next to your game’s name in the dashboard.

Once this is added, as long as you have Steam open and are signed in to it, launching your game (even from the Ren’Py launcher) will behave as if you launched it from Steam, complete with Steam overlay. (Achievements should also work, so you can test them without needing to publish to Steam first.)
However, if you do this, this will cause all games run from the launcher (even those without config.steam_appid set) to run as the last game with a steam_appid set when run from the launcher. For example, if you add config.steam_appid only to ZAGS, and run it from the launcher, and then run YAGS (which doesn’t have steam_appid) from the launcher, Steam will think that you’re running ZAGS while playing YAGS. If you then add config.steam_appid to YAGS and run it again, Steam will correctly pick up that you’re running YAGS.
If you ran the game from the launcher, you can fix this by deleting the generated steam_appid.txt file, located at “<renpydirectory>/lib/<yourOS>/steam_appid.txt”, for example “renpy-7.4.6-sdk/lib/windows-x86_64/steam_appid.txt” if your launcher is normally “renpy-7.4.6-sdk/renpy.exe”. You’ll have to do this every time after running a game with config.steam_appid set from the launcher.
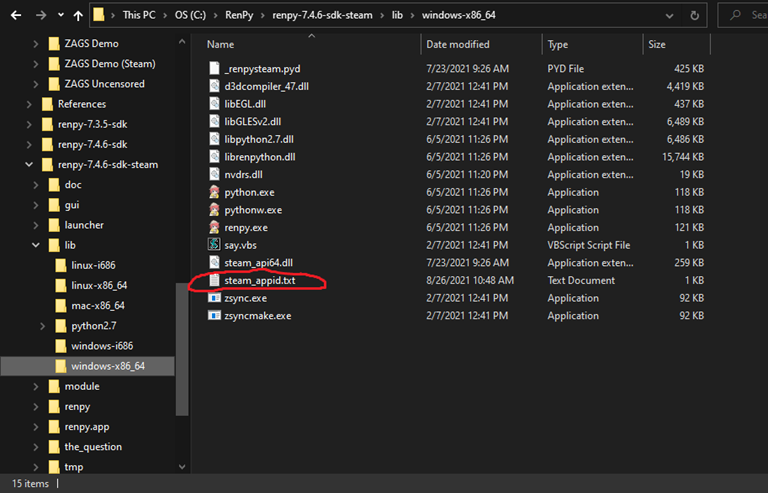
You can also prevent this problem by making a Markets build of your game and running via that build instead of via the launcher, which will ensure that only that build picks up the Steam appid for that game.
Making the Steam Build in Ren’Py
If you’ve uploaded a build to Steam before, it’s recommended that you bump the version from the last release by changing this line in options.rpy (for example from 1.0 to 1.1):
define config.version = "1.0"
(This isn’t strictly necessary, but it’s good for users to be able to understand which game version they’re using when they ask for help. By default, this version info shows up on the “About” screen in your game.)
Make sure you have installed Steam libraries in the launcher before proceeding.
First, make a build of your game as “Windows, Mac, Linux for Markets”.

If your game is at the top level (see Build Configuration), you will need to unzip the resulting file and re-zip it so it does not contain a folder. The ZIP generated by Ren’Py should look something like this:

Unzip it, then navigate into the folder so you can see the exe itself. Highlight all files in this directory, and directly generate a ZIP from that:
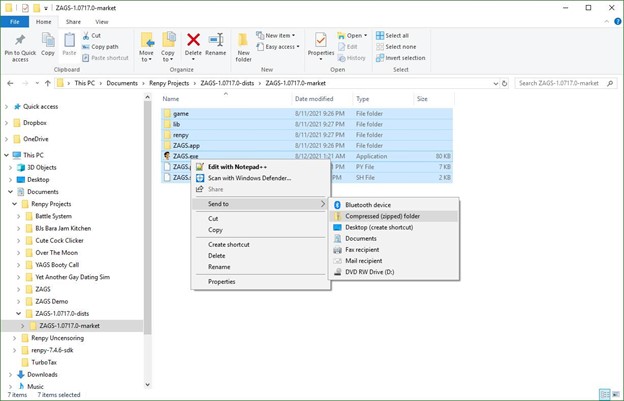
Warning: Do not launch your unzipped game before zipping for Steam. Launching the game will sync all game state from your local computer, including persistent data and save files. Uploading this to Steam will cause all players to share this state, with no way to undo the damage due to the way Ren’Py stores a copy of all data on the local computer.
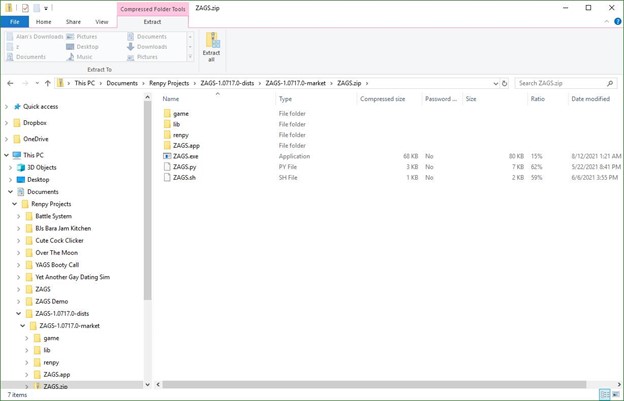
The resulting ZIP file should look like this (with all files at the top level, instead of containing a folder inside it). This ZIP file can be uploaded to Steam.
If your game is not at the top level, you may not need to unzip and rezip the game build. However, you will need to configure your Build Configuration to include the directory name, and you may need to update other configurations with each new build since Ren’Py normally includes the version in the folder name (so you’ll probably want to override the build directory setting). (In general, put your game at the top level. It’ll make your life easier.)
Note: If you are uploading your game via SteamPipe instead of a ZIP upload in the UI (for example, your game is larger than 2GB), you do not need to zip up your game. Instead, drop the unzipped copy of your game in the appropriate folder and generate a build.
Uploading the Game to Steam
Click “At Least One Build Configured” in the checklist, or navigate to Technical Tools > Edit Steamworks Settings > SteamPipe > Builds
If your game is under 2GB, you can upload from the web interface rather than using SteamPipe/the SDK. Click the “here” link.

Then select your ZIP file and upload it. If you have DLC projects (see Creating DLC), make sure you upload to the correct depot. (The default depot for your primary project will be “Your project Content”, for example “Zen: A Gay Sequel Content”.)
The “Standard” upload type is fine.

After uploading, you should see a screen like this. Add a comment and set the build live for the “default” branch. (If this is your first upload, there won’t be a branch yet, so just select None. If your game is already released, you may not want to immediately set it as live or to select a different branch… see After Release.)
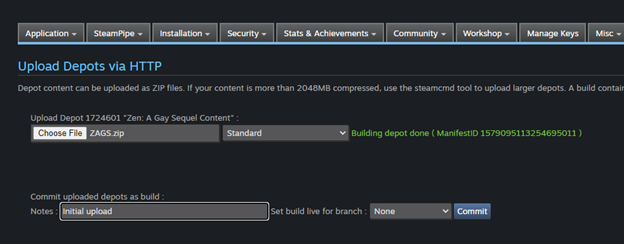
If this was your first upload, you’ll need to manually set the build live. Select the default branch, Preview Change, and then set it live. (For future uploads, you can set them live immediately after upload when you commit.)

If your game build is larger than 2 GB, you might be able to use the web tool to upload it in parts, but you’ll probably be better off figuring out the Steam SDK tools. You might try LewdPixel’s Steam Guide for help with that.
To avoid having to later fix a bad upload, here’s a checklist of things to validate before uploading your ZIP:
- You made your build from a Steam-enabled Ren’Py launcher
- You did not change support for 32-Bit Windows builds since the last build upload
- You are using archiving and did not change archive settings, or you did not remove any asset files (images, music, etc) since the last build upload
- You unzipped and re-zipped the Ren’Py generated build if appropriate
- If you are not putting your game at the top level, then instead ensure that the new build has the same folder name as the old build
- You did not run your game between unzipping and re-zipping
- Really, you did not run your game between unzipping and re-zipping
- If you upload a build with save data intact, the situation is unrecoverable without fully resetting user progress and invalidating save files for all users, because of how Ren’Py handles save data on a local computer
- If you’re paranoid, navigate into your zip file before uploading and ensure there is no game/saves folder
Build Configuration
You must decide whether you want your game to live inside a folder, or at the top level, given that Steam will already create a folder for your project.
For example, do you want your game at the top level as
<steam directory>/Zen A Gay Sequel/ZAGS.exe
Or in a folder as
<steam directory>/Zen A Gay Sequel/ZAGS/ZAGS.exe
In general, the former (at the top level) is easier, unless you are planning on having non-game DLC in a separate directory. It will also make game-patching DLC simpler. (If you’re not putting your game at the top level, we highly recommend overriding the build directory name so it does not change between build versions.)
We will assume you are putting your game at the top level, rather than inside a folder. This means you unzipped and appropriately re-zipped your Ren’Py build above before continuing with upload below.
Navigate to Technical Tools > Edit Steamworks Settings > Installation > General Installation and click the Add New Launch Option button

Click the button two more times until you have three launch options. Do this before editing any of them, or changes will not be saved.
The three options will correspond to Windows, Mac, and Linux. Use these settings:
- Windows
- Executable: <yourgame>.exe
- Launch type: Launch (default)
- Description: Launch
- Operating System: Windows
- Mac
- Executable: <yourgame>.app
- Launch type: Launch (default)
- Description: Launch
- Operating System: macOS
- Linux
- Executable: <yourgame>.sh
- Launch type: Launch (default)
- Description: Launch
- Operating System: Linux + SteamOS
If your build generates a 32-bit executable, you’ll need two different Windows launch configurations (for four total configurations)
- Windows 64-bit
- Executable: <yourgame>.exe
- Launch type: Launch (default)
- Description: Launch
- Operating System: Windows
- CPU Architecture: 64-bit only
- Windows 32-bit
- Executable: <yourgame>-32.exe
- Launch type: Launch (default)
- Description: Launch
- Operating System: Windows
- CPU Architecture: 32-bit only
Save each update as you make it by clicking the “Update” button.
If your game is not at the top level, and is a directory instead, include the directory name in the executable settings (for example ZAGS/ZAGS.exe instead of just ZAGS.exe).
If you’re following these steps in order, this is enough to make your game playable natively within Steam. Follow the instructions in Testing Your Game to play your game through the Steam client. Exciting!
Debugging Build Configurations
Before doing anything else, check whether your Application name, Depot name, or Package name in Steam contains a period. (Thugzilla ran into a problem with launching when this was the case, as it caused a period to be added in the local Steam folder name.)

In particular, the Install Folder (dashboard > Edit Steamworks Settings > Installation > General Installation) should not have a period in it.

If the build settings don’t work. Look at the files in your Depot and ensure that the exes are where you expect them to be. Click dashboard > Edit Steamworks Settings > SteamPipe > Builds and click on the depot number for any build to see the contents of the depot. (If you have DLC, Steampipe will automatically merge DLC metadata as a new build every time you upload changes, but you don’t care about those merged builds.)

You’ll see a complete list of all files within that depot.
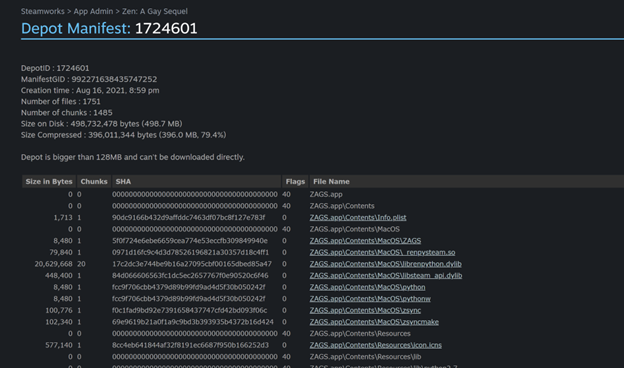
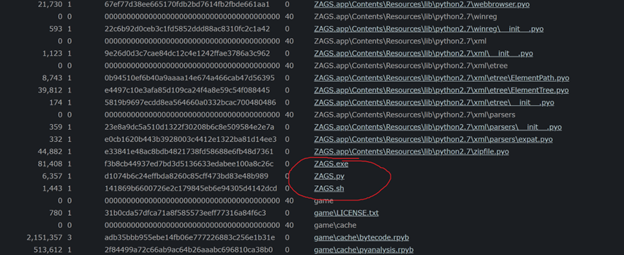
Verify in that file list that the exe is either at the top level or appropriately in a folder that is part of the Build Configuration path, based on your settings..
Fixing a Bad Upload (via Web UIs)
Made a mistake when uploading? Maybe you forgot to unzip and re-zip or maybe you have some uploaded files that you now want to delete… (With thanks to Thugzilla for letting me mess with his game depots for this section.)
(See also I Ran My Game Before Re-Zipping and Uploading for handling of that particular unfortunate situation.)
If your game isn’t yet released, you can create a new depot to fix the problems, essentially starting your project from scratch. (You could probably also delete files or clean them up via the SDK for a less-destructive approach, but we’re taking a web-browser-focused approach in this document, instead, and you can’t delete files in a depot from the UI.)
If your game is already released, you can probably still do this, but it may play badly with different data sync mechanisms. (For example, this would not resolve issues where you accidentally uploaded persistent and save data to Steam for end users, because of how Ren’Py handles local save data.) It is likely to also be a fairly bad experience for users.
First, navigate to dashboard > Technical Tools > Edit Steamworks Settings > SteamPipe > Depots and create a new Depot in your project. Select the next Depot ID after your current one. (The ID doesn’t really matter, but you just want to make sure it’s not one you’ve potentially used in the past.)

You should see something like this. The error is fine for now. Make sure the depot is set to All OSes, and then click the “Save” button under “Save Depot Changes” further down on the page.

After saving, the new depot should be assigned to the Base App. This is correct.

Publish the changes (via the Publish tab) to ensure that the new depot is properly picked up by the build.
Navigate to SteamPipe > Builds, click the “here” link, and upload your ZIP file (with the fixed build) to the new depot. Set it as live on the default branch and commit.

Next, you’ll need to switch the Depot in all packages to the new Depot. Navigate to dashboard > View Associated Items > All Associated Packages, DLC, Demos, and Tools. There should be three packages there: the Store (or Free to Play) package and two special-use packages (Beta Testing and Developer Comp).
For each of these packages, Add/Remove Depots and switch to the new depot. You must do this separately for all three packages.
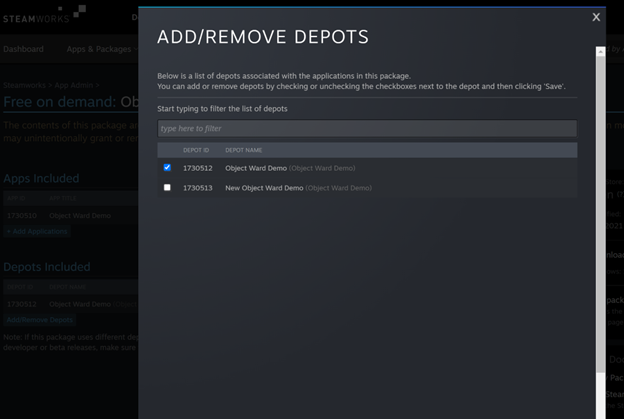
Finally, navigate back to the depots view (dashboard > Technical Tools > Edit Steamworks Settings > SteamPipe > Depots) and delete the old depot, which should no longer be referenced, by clicking the “X” at the end of the line.
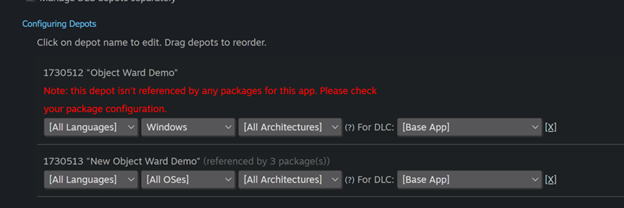
As always, save Depot changes with the “Save” button, then re-publish.
Fixing a Bad Upload (via SteamPipe)
If you used SteamPipe to upload, simply delete all files, add the fixed version of the game, and go through the build process again. SteamPipe replaces all depot files (instead of doing additive uploads like the Steamworks UI).
Please see LewdPixel’s Steam Guide for details on uploading with SteamPipe.
I Ran My Game Before Re-Zipping and Uploading
Ouch.
No, seriously. Don’t do that. But it’s probably too late for that warning if you’re reading this section. In the future, I recommend following the checklist under Uploading the Game to Steam before every upload, so you don’t run into this situation again.
You are very sad now because Ren’Py stores all save data (save files plus persistent game data) in two places: Inside the application directory itself (ex: Yearning A Gay Story/YAGS/game/saves) and on a user’s local machine (for example: C:\Users\<you>\AppData\Roaming\RenPy\YAGS-123456). You cannot touch the latter, no matter how many builds you upload to Steam, and Ren’Py automatically syncs data between the two locations.
This effectively means that all users who launched the version of your game where you incorrectly uploaded save data have (portions of) the bad data on their local machines that cannot be removed by you.
(You might be even sadder if you enabled Steam Cloud saves, as that will further sync all save files to the cloud, which you also cannot remove.)
You basically have two options now:
- Upload a fixed build and permanently screw all users who received your incorrect build and launched the game while it was incorrect
- Reset all game progress (including persistent data and clearing all save files) for all users
Technically, you have a third option, but this isn’t really viable:
- Upload a fixed build and tell users how to recover by manually deleting selected files from their local computer and Steam game directories
- This may not work anyway given Steam cloud
- This will still result in some users losing saves and persistent data
- Users won’t follow the instructions to do this
Upload a Fixed Build
Generate a new zip, follow the instructions for fixing a bad upload above (particularly the parts about creating a new game depot, because new uploads to the existing depot are additive, and will not remove the badly-uploaded save files). (You could also use other Steamworks tools such as Steampipe that allow deletion of files, but we're assuming here that you're interacting entirely through Steamworks UIs.)
Hopefully you caught the error quickly enough that very few players launched the game in the meantime.
All players will be forced to re-download the game. However, thanks to Ren’Py’s local storage as well as Steam Cloud, progress should be persistent.
(Players that launched the game with your bad build will continue to be in a bad state, and you have no way of recovering from this.)
Reset All Game Progress
If it took you a while to catch the issue and many players have already launched your game… well, now you’re really sad.
The option to nuke everything should not be taken lightly, as this will reset all player progress and effectively delete all of their saves.
First, update this line in options.rpy to something different. Changing the numbers at the end is enough.
define config.save_directory = "SOMETHING-12345678"
What we’ve done here is changed the folder inside C:\Users\<you>\AppData\Roaming\RenPy so the new build of your game will not pick up the old local data.
After that, build in the same way as before except do not unzip and rezip. We’re going to rely on the fact that the game now has a subdirectory to fix the save syncing issues. So if your game was previously “Yearning A Gay Story/YAGS.exe” it should now be “Yearning A Gay Story/YAGS/YAGS.exe”. (You may wish to override the build directory name to be consistent, while you’re at it, so it doesn’t include the version number.)
Refresh your memory with the Build Configuration section for what all of this means.
Next, change your Steam Cloud save settings to add another directory to sync. This should now include the subdirectory. (Ex: YAGS/game/saves instead of game/saves)
This makes it so Steam cloud will not simply re-sync the bad files into the new, clean build once the game is launched again.
Next, follow the above steps for fixing a bad upload, including creating a new depot.
After all of that, you should effectively have a new version of the game where both Ren’Py’s local syncing and Steam Cloud’s syncing do not sync the bad save files.
Configuring Steam Cloud Saves
This step is optional, but will allow players to synchronize their save data across computers, including any persistent data. If you do this, it is highly recommended that you use Persistent Data merging where appropriate.
Navigate to Technical Tools > Edit Steamworks Settings > Application > Steam Cloud. You should see something like this

Byte quota should be 10000000 (ten million bytes, or 10 megabytes), and 500 files. (This should be more than enough for most games’ save and persistent data, but if your game uses particularly many variables or uses classes as variables, you may wish to raise the byte quota.)
Save these settings, and some new options should appear.
First, uncheck the Beta Testing checkbox. (This checkbox seems to sporadically get re-checked, so ensure this is not checked before you actually launch your game.)
Scroll down to the Steam Auto-Cloud Configuration section, and click the Add New Auto-Cloud Path button. Add a new entry against the root with the subdirectory “game/saves” with the * pattern for all OSes. The setting should look like this after saving.

Make sure to save the page itself as well, afterward.
(If your game is located in a folder as per Build Configuration, you will instead need the path to the saves folder, such as “YAGS/game/saves”)
Setting a Price
On your dashboard, you should have a single package for your game under “Store Packages, Pricing, & Release Dates”. Click on the package row.

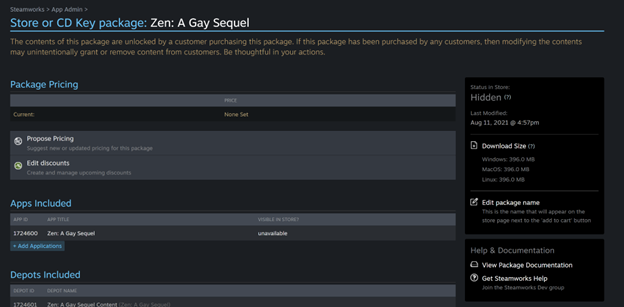
You should see a screen like this if you haven’t priced your package before. Click “Propose Pricing”.
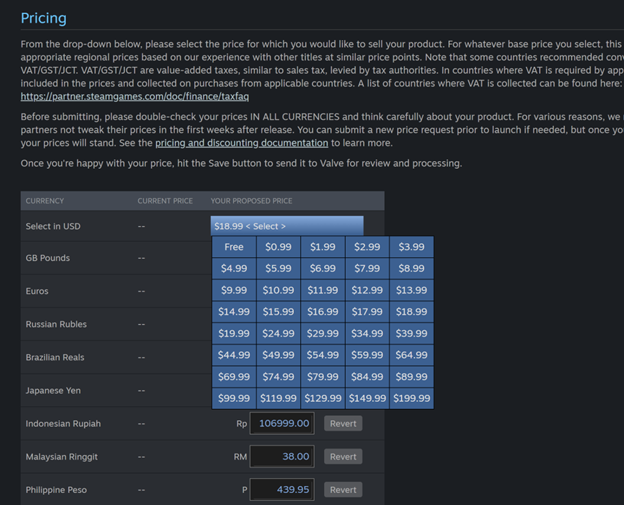
Select a USD price, and the other currencies will automatically populate. Note: The other currency values are NOT calculated via current exchange rates, and will mean your game actually sells for cheaper in most other countries. Set accordingly.
Steam says they’ll “review” prices, but the first one seems to be fairly automatic. Just publish when ready.
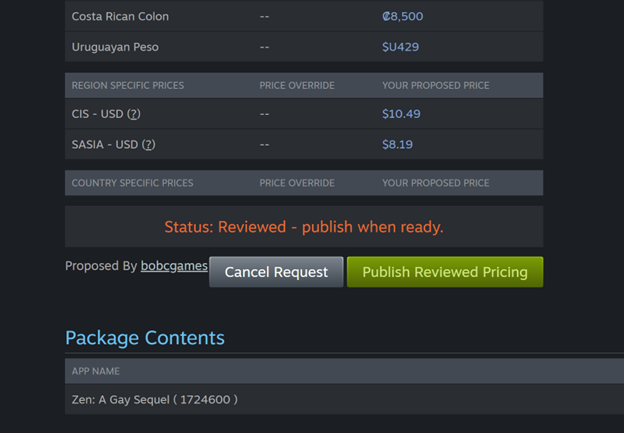
You can also set a launch discount from the dashboard, under the release date.

Setting Supported Operating Systems
Navigate to Technical Tools > Edit Steamworks Settings > Application > General, and ensure the supported operating system settings match your build and other configurations.
You’ll need to check (or not check) the 64 Bit Only checkbox for Windows based on your Ren’Py build configuration. The macOS build is not notarized, but is 64-bit compatible.

Submit Your Game For Approval
After completing all of the required steps in the game build checklist, the section will turn green.
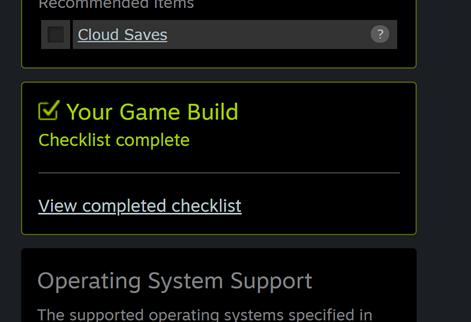
At the top of the dashboard, you’ll be able to submit your game build to Valve for review by clicking the big blue button.

Review, as noted, will take a couple days.
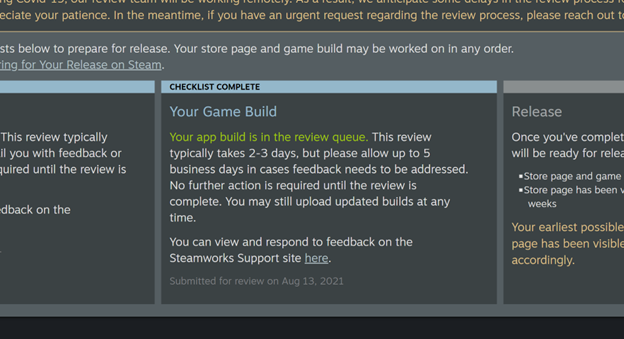
You will receive an email after your game build is approved for launch. You still won’t be able to launch until the time criteria (two weeks after coming soon, or 30 days after buying your first app credit) are met.

After the release criteria are met, you can release your game, which allows your game to be purchased and downloaded.

If Valve requires changes to the page or any images, the requested changes will be emailed and will also appear in the “Checklist Complete” section at the top of the dashboard. After making changes, you’ll mark the page as ready for review again until it is ultimately approved.

Provide Save Files to Steam Support
(WIth thanks to Cyan for this information)
There may be times when Steam support requests save files to help test your game.

If you receive this request, do not upload save files to the regular "default" app branch. This will cause the same problems as if you run your game before uploading it to Steam. (See I Ran My Game Before Re-Zipping and Uploading if you did this.)
The best way to proceed is to upload the save file to Google Drive or Dropbox, and share the link with support. Tell them to copy the file into the /game/saves directory. (This has been acceptable for other devs, despite the message in the failure requesting that the save file is in the repository.)
(To actually find the file that you should send, click the "game" link under "Open Directory" in the Renpy launcher for your game. Navigate into the "saves" directory from there. Save files are named by the page and save slot, so if you want to locate the first save file on the second save page, you'll want the file called 2-1-LT1.save. In the default save menu, the slots are numbered left to right, then top to bottom.)
If this is not acceptable to support, you must upload a save file on a separate beta branch for your game. Do not upload any save files to your primary "default" app branch. If you use a beta branch, you will probably want to set a password on it, and upload the save file(s) in the correct path (for example: game/saves). For help with creating branches, see After Release.
| |||||


