Guide:Ren'Py visual novels on Steam/App
|
|
This page is community guidance. It was created primarily by Bob Conway. Like all guides, this page may contain advice that is not valid, safe, or suitable for your particular situation. Please exercise caution. Learn more Community contributions were not requested - please discuss on the talk page before editing this guide. |
Create the App
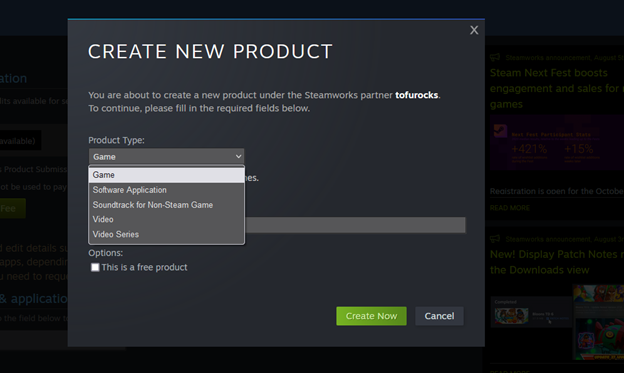
After purchasing an app credit and logging in to your dashboard (https://partner.steamgames.com/dashboard), you will see the "Create new app…" button. Click it.

Select "Game", and check "This is a free product" if your game will not be for sale.
Note: Even with a paid game, you can provide a free demo. Do not check "This is a free product" if you intend to offer your game for purchase with a free demo.

Steam will create the app, and it will show up on your dashboard

The next two steps (creating your store page and uploading your game) can happen simultaneously. However, remember that you will not be able to actually release your game until two weeks after the store page has gone live, or 30 days after you purchased your first app credit, so it is generally a good idea to tackle your store page first.
Note: It may be in your interest to put up your store page significantly before your game launches. See this thread for details. In such a case, prioritize the Create Your Store Page steps and get the page launched as soon as possible while you continue working on your game.
Some Terminology
You will see the following terms used in Steamworks. It’s not necessary to have a deep understanding of them, especially if you’re just following the steps below, but it’s still useful to understand how things fit together.
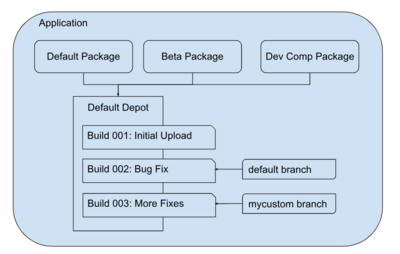
At the top level is your Application (or App). This is the topmost representation of your game, and will contain all of the store page configurations within it, in addition to multiple Packages. The App has a dashboard that links to all other sections and has a checklist of steps required to release the store page and the game build. An App can also have sub-Apps (Demo, DLC, Soundtrack, etc)... you can view associated child Apps via the dashboard > View Associated Items > All Associated Packages, DLC, Demos and Tools.
An App contains multiple Packages. By default, an App contains three Packages: The default package you’ll sell, a Beta Testing Package (for which you can generate keys and have other players test the game before its release), and a Developer Comp Package (the one you install and run before the game is released). A Package contains one or more Depots. A Package is also the unit that you actually sell in Steam, so pricing is attached to Packages. You can view all Packages for an App via the dashboard > View Associated Items > All Associated Packages, DLC, Demos and Tools.
A Depot is a named collection of files, which you can roughly think of as a folder on your computer. Every App has a "default" Depot, and you can create multiple Depots and share them across apps by adding them to Packages. For simplicity, we’ll only be using the default Depot created for each App (and not messing around with Packages unless necessary), but you can do more complicated things to share assets (music, sprites, etc) across different Applications by creating shared Depots. Your primary encounter with other Depots is likely to come if you create DLC, since by default, DLCs are modeled as additional Depots under the base Application.
A Build is a particular upload of files to one or more Depots. Think of it as a copy of the folders at a point in time. You can upload new files into a Depot, which results in a new Build from that Depot.
A Branch is a named representation of one or more Depots’ state, allowing you to have different "current" versions of a Depot. Think of a Branch as a name indicating which copy of the (Depot) folder you’re currently using. There’s always a "default" Branch available, and you don’t have to create additional ones unless you want to make changes After Release without affecting the live public version.
| |||||


